Thursday 30 April 2009

Bokashi blunder

There had been an odd smell in the kitchen for a few weeks. We just couldn't work out what it was. A blocked sink u-bend? the pot of coriander? Something at the back of the fridge or cupboards? Everything was checked, but the smell continued.

We didn't think it could be the Bokashi bins because they're not supposed to smell, but, as it turns out, it was.

The Bokashi bins had been great during the winter months, using them meant that we didn't have to traipse all the way down to the compost bins at the bottom of the garden (because the wormery, which is closer, had practically gone into hibernation and you can put anything into a Bokashi bin).

When the wormery warmed up and the worms were happily munching their way through our kitchen scraps we had (I'm extremely sorry to say) neglected the bokashi bins. Plus we had only read the beginning part of the instructions propery, the bit about filling it, so had forgotten that once the bin is full it's only supposed to be left for two weeks max before either adding to the compost bin or digging into the garden.

It had been about two months since we'd filled the second bin! Whoops.

Having said that, I'm not sure that the smell was just due to the length of time the materials had been fermenting. During those two months, we hadn't been draining the liquid off regularly either. Or possibly we hadn't added enough of the innoculated bran...

What is for sure, it that we'll definitely be paying more attention this time round.

Full Bokashi binI wasn't really sure that to do with the contents of the bins. I don't know if they will still have the same beneficial properties of properly made bokashi (probably not), or whether they are going to kill any plants that grow near it (I hope not!), so I decided to add one to our main compost bin (on the grounds that it's only half full and it will be diluted) and one to a flower bed.

Craig (Transition House) had recently moved a buddleia to a better position. The area that it was growing in is sandy, nutrient poor and dry. Hopefully the mixture will improve the soil. My guess is that any organic matter would improve that soil, but I'm not going to risk my veggies in it just yet!

Thursday 23 April 2009

Tetra pak purse

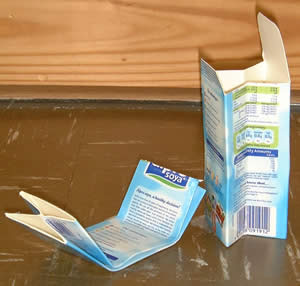
Tetra Pak purse - the one I made!I was given one of these rather super recycled tetra pack purses recently and need to know how it was made, so I took it apart.

I'd volunteered to make a load for the local food initative. They are running a stall at a country show and are looking for some interesting things to draw the crowds in. I think they'll need a few more ideas, but hey, it's a start!

It turns out that they are really easy to make. I reckon they would make great party bag gifts for eco-conscious mums, or as an unusual crafty present for any green friend.

The rest of this post consists of instructions for making the purse. If you can't get your head round the stages or don't have enough time to make one and you've decided that now you know they exist you simply can not live without one, please just send me an email and I'm sure I can sort something out for you; transition dot housewife at google mail dot com (removing all spaces and were "dot" = "." and "at" = "@").

Instructions for making a tetra pak purse

Step one, save some tetra paks1) You'll need some tetra pak cartons. For this purse I used the tall 1 litre type.

2) If you're going to save up the packs and create a lot of purses in one go, rinse out the cartons as soon as they are empty (reduces the likelyhood of that final drop of juice going mouldy and smelly while you store them).

Step two, cut off top and bottom and clean and fold3) Cut off the top and bottom.

4) Clean thoroughly, then dry.

5) Neatly fold (concertina) the sides of the cartons inwards, so that the carton lies flat.

6) Decide which what side of the carton you'd like to me most visible and put that side on the table.

Steps seven (left) and after step 11 (right)7) Fold the bottom of the carton towards the top, and the top towards the bottom, so that it has three (aproximately equal - but the top can be shorter) parts.

8) Cut down each of the four orginal corners from the top of the carton to the nearest (top) fold.

9) Cut away the top sides between the cuts you made in step 8.

10) Round the top of the flap on the external side of the carton.

Step 12, fold the purse11) Cut the internal flap to about 1.5cm (half an inch) above the crease and diagonally cut from about 1cm along that edge to the nearest corner (on each side).

12) Fold the bottom of the carton to the middle

Step thirteen, secure13) Put the shorter flap over and inside of the bottom compartment. You will need to secure this some how. I've used a paper clip in the photo because I couldn't find a darning needle to make some holes and sew the sections togther - that would be my preferred method, but you could glue the flap in place.

14) Make a hole in the middle of the top flap about 1cm from the edge. I used a hole-punch.

15) Put an elastic band through the hole, then through the elastic band and tighten.

Tetra Pak purse16) Loop the elastic band around the purse to secure the contents.

17) Hold the complete purse up and feel jolly proud of yourself.

18) Recycle any of the bits you cut off at the nearest tetra pak recycling bank if you have one.

If you can't be bothered with all of that, but really really want one of these fabulous purses, please send me an email at; transition dot housewife at google mail dot com (removing all spaces and were "dot" = "." and "at" = "@").

Friday 17 April 2009

Chilli hot house

Growing chillies in yoghurt potsCraig has a penchant for chillies so this year I'm growing him several different types (some have rather concerning names like "Ring of fire" and "Fatalii"). Anyway, that combined with my desire to have a bountiful vegetable garden means that I am rapidly running out of window ledges to start my seeds off on.

I have one of those clear-plastic covered shelving units, that's full too. I could get more, but I would have no where to put it without it getting in the way of opening windows, plus they don't really have enough space for cucumbers to grow.

I've been investigating greenhouses. Our back garden is south-ish facing so should be ideal. The thing with greenhouses, well there are two things. The first is that if you get a stand alone one in order to get the most out of it during the winter it needs extra heat. The second, if you attach the green house to your house it's not a conservatory. By which I mean, if at some point you want to sell your house, people expect (or at least in this neighbourhood) attached mainly glass rooms to be sunny sitting places with blinds.

Permaculture principles and logic suggest that the lean-to type would be best. The lean-to will help heat the house during the day, and the house will help heat the greenhouse at night. The fact that if I had a conservatory I'd only fill it up with plants anyway suggests that I may aswell go for the cheaper lean-to greenhouse option.

So a lean-to greenhouse it is.

I've checked the pretty cool (for government) interactive UK planning guidance on the web and it won't need planning permisson - it's not going to be that big. If there is a door into it directly from the house though it will need safety glass. If you're thinking of getting a green house, best you check the planning site for your specific situation.

If I can find a lean-to greenhouse that suits, we'll have a chilli hot house soon. I just hope the chillies don't live up to their names.

Saturday 11 April 2009

Story of stuff

Story of StuffI've been meaning to watch the Story of Stuff for a long time now. I don't know why I didn't watch it earlier, just one of those things. It's a 20 minute long animated story of the mess our consumerism is getting us into written by Annie Leonard. Concise and nicely illustrated. Definately watch it if you have 20 mins spare, and encourage others to watch it too.

The Story of Stuff reminded me of a great book, The Ecology of Commerce by Paul Hawken. Get it from the library (it's going to take longer than 20mins to read though!).

Wednesday 8 April 2009

Easter egg headache

Easter egg headache
If I had anything to do with it, I’d have nothing to do with Easter eggs. Everything is just stacked up against them;

  • I’m not Christian, so Easter has no religious meaning,

  • The chocolate used is mediocre at best and…

  • … way too expensive,

  • The packaging is excessive.


So why do I get in such a tizz about them? Because I’m expected to buy something around this time as a gift because I’m an Aunt.

So what should I do? As far as I can tell I have five options

Option 1 – Buy nothing
And look like a rubbish money-pinching aunt to my family, nephew, niece, their neighbours, play friends, school, village and countless others. Even if I did explain all of the points above, what would be remembered about my present is that the kids didn’t get anything from me.

Option 2 – Buy non-fair-trade, over packaged Easter eggs
This would probably go down best with the little chocolate munching munchkins, after all it's what the countless adverts say will happen, but would leave a bitter taste in my mouth. It’s not an option really. Even if I sought out an egg with non-excessive recyclable packaging, it’s unlikely to be fairly traded and if it is – see option 3.

Option 3 – Buy a fair-trade Easter egg
This would be an option if they were a little older, but frankly their expectations and the fair-trade eggs market are two very different things.

Option 4 – Buy something else
Why? They are expecting eggs. I don’t understand Easter bunnies. As far as I know they are not religious either, so yes the whole thing is even more of a consumer nightmare than I am prepared to start thinking about. Plus the whole point of Easter when you are a kid is to tell your friends how many chocolate eggs you got. End of.

Option 5 – Make something
What? A chocolate Easter egg? I can’t even imagine all of the moulds that I would need and time, and for what? to get that look that means, “What’s this? I wanted a Mars egg”. Make something that isn’t a chocolate egg? What would be the point of that? - see option 4.

Worry not; I have a cunning plan, or at least half of one... if I ignore any Easter/consumerism arguments. It should keep everyone happy, apart from Craig (Transition House), he prefers option 1.

Thursday 2 April 2009

Baby Baobabs

Baobab seedlings - Adansonia DigitataThere are only a few things that are guaranteed to get me dancing around the kitchen on a Saturday morning like a whirling, jumping loon. This was one of those moments.

My Baobab seeds have grown!!!!!!!! well, two of them. Two out of ten ain't bad.

The Baobab (Adansonia Digitata) is native to Africa, I first found out about it from a Tree Aid leaflet. It is the most amazing tree, you know the kind of thing - the fruit has more vitamin C than 6 oranges, more calcium than milk. Plus, when it's fully grown it looks like it's been planted upside down. It's ggrrrrrreat!!

Oh, the courgettes, soya bean, peppers, chillis, goji berries, rainbow chard? They're doing fine too.

Plarn purse

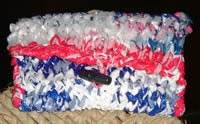
Plarn (plastic bag yarn) purseA quick update about the plarn knitting experiment (hate plastic, love plarn post). A friend gave me a load of plastic bags that were nearing their re-use (as a plastic bag) life, so I was able to get on and start knitting with plarn.

As it was just an experiment I wasn't too fussy about the colours of the bags I used, but as I like the finished texture I now wish that I had thought more about the combinations! The colours kind of work.. erm.. possibly...

Anyway, I created the plarn and started knitting. The plarn as described is a kind of two-ply yarn, that was quite thick to work with, but no knots because of the way the strips are joined. The plarn would go further if the lengths of plastic are knotted as single strips, so I'm trying that now. It will of course effect strength and texture as the knots might get in the way of the knitting, but I'll see and post up the next creation.